Manual Setup
Manual Setup is for those users who have a unique home network set up. Most people will not need to use this process. Only those who need to specify their primary and secondary DNS, or have static IPs assigned to their wireless devices should have to use this setup process. Unless you know for sure, it is highly recommended that you try the "Search for an Access Point" first. Otherwise, we'll walk you through the Manual Setup Process.
To connect through the "Manual Setup" feature, follow these steps.
1. The Setup Utility program is included in all Nintendo WFC-compatible Nintendo DS games. This utility program will configure the Nintendo DS to communicate with a wireless point, like a wireless router or a Nintendo Wi-Fi USB Connector, and save the setup information in the memory of the Nintendo DS. Refer to the specific instruction booklet for the Nintendo WFC-compatible game you are playing to find out how to access the Setup Utility. It may be different in each game.
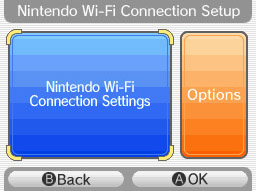
2. On the Nintendo Wi-Fi Connection Setup screen, tap the "Nintendo Wi-Fi Connection Settings" box.
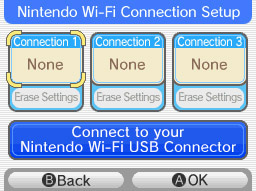
3. Tap one of the connection save files (1, 2, or 3). (Multiple save files are available should you wish to save connection settings for other locations.)
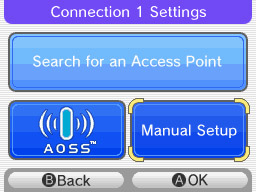
4. Tap the "Manual Setup" icon on the screen.
5. The following list of settings will be presented. Tap the "Edit" icon for each setting you need to enter.
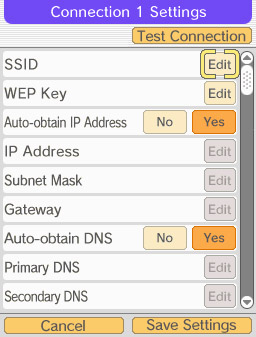
Your SSID or Service Set Identifier is the name assigned to the access point of your wireless network. Enter the name exactly as it appears in your settings on your router.. For more information on locating the SSID for your router, check our router lookup tables here and select your router manufacturer and model number.
WEP Key is a security setting for your router. WEP is the only security that is compatible with the Nintendo DS Wi-Fi Connection. You will need to set your router for WEP security -- or remove security on your router -- to use the Nintendo DS at this access point.
If you know you do not have security on your router, you may leave this field blank.
If you do have WEP security, you will need to enter a WEP Key on your Nintendo DS to use the access point. The WEP Key is usually found in the "security" tab of your wireless router settings. Once you know the WEP Key, you will need to enter it when prompted.
In some cases, this may be all the manual information required. Tap "Test Connection" at the top of the list of entries here to determine if your DS is able to make a connection. If so, you can skip the remaining settings and save your entries.
Auto-Obtain IP Address, IP Address, Subnet Mask, Gateway, Auto-Obtain DNS, Primary DNS, Secondary DNS:
Locate the TCP/IP properties on your personal computer. Accessing the properties of the TCP/IP properties screen may vary from one operating system to another. In Windows®, access Control Panel, select Network and Dial Up Connections, select Properties for your Local Area Connections. Select Internet Protocol (TCP/IP) on the list of components, and click on the Properties button. You should see a dialogue box such as this:
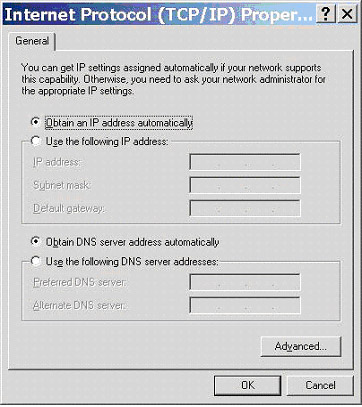
If Obtain an IP address automatically and Obtain DNS server address automatically are both selected, then select Auto-Obtain IP Address and Auto-Obtain DNS on the manual select dialogue box. Now test your connection. If this is successful, save your settings.
If Use the following IP address is selected, then do the following:
- Increase the last four digits of the IP address by one number (if it is 111, for example, change it to 112) and enter this number into the manual settings screen of the Nintendo DS.
- Enter the information for Subnet mask into the Nintendo DS exactly as it appears on the Internet Protocol (TCP/IP) dialog box.
- Enter the information for Default gateway into the Nintendo DS exactly as it appears on the Internet Protocol (TCP/IP) dialog box.
If Use the following DNS server addresses is selected, then do the following:
- Enter the information for Preferred DNS server into the Nintendo DS exactly as it appears on the Internet Protocol (TCP/IP) dialog box.
- Enter the information for Alternate DNS server into the Nintendo DS exactly as it appears on the Internet Protocol (TCP/IP) dialog box.
After entering the information, test your connection.
- A confirmation message will show on your Nintendo DS screen if the connection test was successful. You can now back out of the Nintendo WFC setup menus and return to your game screens. Select the Wi-Fi option for the game you are playing (consult the manual for the game for more details) to connect online.